WE'VE MOVED!! You can now find us at Sunshine and Spoons!

Showing posts with label Recipes. Show all posts

Friday, December 5, 2014

Pie Crust Cookies or How to Use Up Extra Pie Dough

The one problem I have with making pie is that I always end up with extra pie dough.  I hate throwing food away so I came up with a way to use it up.

Roll the extra dough out just like you would for a pie crust.  Use a cookie cutter to cut shapes out of the dough.  Re-roll as necessary until you've used it up.

How to use up extra pie dough

Lay the cutout shapes on a cookie sheet (I line mine with parchment paper) and brush with melted butter.  Sprinkle the cookies liberally with cinnamon sugar.  Sometimes, I skip the melted butter because I'm lazy and they still turn out delicious!
 
How to use up extra pie dough

Pop the cookies in the oven for 5-10 minutes or until golden.  Watch them closely because they'll burn fast!

How to use up extra pie dough
Star's baby doll helped me watch the cookies while they baked

Enjoy!
 
How to use up extra pie dough


Thank you for stopping by my blog! I appreciate each of my readers and would love to connect with you on Facebook and Instagram! 

Monday, January 27, 2014

Easy 3 Layer Sin Bars

These are Hubby's favorite bars and they're so easy to make even though they're made with three different layers.  The only problem I have with making them is that I really like them too and let's just say they're not so good if you're on a diet.  :)


You can read an updated version of this recipe here on my new blog, Sunshine and Spoons! I hope to see you there!

Saturday, December 14, 2013

Easy 3 Ingredient Oreo Cheesecake Truffles

I get requests to bring my Oreo Cheesecake Truffles to just about every Christmas get-together I attend and since they're so quick and easy to throw together (and so delicious!), I don't mind making tons of these.

And the best part?  They're just 3 ingredients.


Oreo Cheesecake Truffles
1 package of double stuf oreos (you can use regular if you'd rather)
1 package of cream cheese, softened
1 package of vanilla or chocolate almond bark

Finely grind the oreos in a food processor.  Stir oreo crumbs into the cream cheese.  If desired, keep back about 1/4 cup of crumbs for garnish.  I usually end up stirring the mixture together with my hand towards the end of this process since it can be hard to incorporate all the crumbs into the cream cheese otherwise.  The mixture will be slightly sticky.  Form the mixture into 1" balls and place on a parchment or wax paper covered cookie sheet.  Freeze the balls for 15 minutes.  While the balls are in the freezer, melt the almond bark.  Dip the frozen balls in the almond bark and place on parchment or wax paper to harden.  Sprinkle with oreo crumbs or other garnish before the almond bark has set if desired.

Bring to a party and watch them disappear!  Make sure you eat a few before you leave or you may not get any :)


Sunday, June 30, 2013

5 Things To Do With Leftover Frosting


When I make cakes for the kids' birthdays, I usually end up with some leftover frosting.  Sometimes it's leftover homemade frosting, sometimes it's from a can of frosting, and sometimes it's a little leftover from a tube of decorating frosting.  No matter what kind it is, I firmly believe that frosting is the best part of a birthday cake, and that the cake is pretty much just a carrier for the frosting.  No way am I throwing frosting away. 

Here are 5 things you can do with leftover frosting:

1. Eat it straight out of the bowl/can/tube. 

2. Make graham cracker or saltine cracker sandwiches.  The kids love this.


Princess enjoying a graham cracker frosting sandwich

3. Feed it to the kids right before they go to Grandma's for a few hours.  Call it sweet revenge.

4. Make cookies.  This recipe is genius!

5. Melt it in the microwave for a few seconds and drizzle over ice cream.

What do you like to do with leftover frosting?  Which do you like better...the cake or the frosting?


Thanks so much for visiting Supermommy!...Or Not.  I'd love for you to like me on Facebook or follow me on Twitter!

Monday, December 10, 2012

Virtual Cookie Exchange

I love trying out new cookie recipes this time of year.  Do you have a favorite recipe you'd like to share?  The recipes don't have to be cookies, any dessert will do!  Link it up below!


Thanks so much for visiting Supermommy!...Or Not.  Please take a moment to "like" me on facebook"! 

Thursday, November 1, 2012

...Then We Had Bat Poop For Dessert.

If you're gagging after reading the title of this blog post, don't worry.  I'm not that bad of a cook.

But I did make Bat Poop for dessert tonight.  I know my mom is reading this and thinking something along the lines of, "Seriously?  She couldn't rename it something a little less...revolting?" 

I could.  But it's kind of fun to see the looks on people's faces when I offer them Bat Poop for a treat.  Although I've also called these "Fluffernutter Balls" when I'm not trying to horrify people.

This is something that Hubby's mother makes every fall and, after we got married, Hubby asked me to carry on the tradition.  The first year he asked me to make him some Bat Poop to take to work, I thought he had lost his marbles.  

Bat Poop

One 7-ounce jar of marshmallow fluff
One 18-ounce jar of smooth or crunchy peanut butter
Two cups of chocolate chips
One package of chocolate almond bark


Mix the first three ingredients together.


It will make a stiff dough when it's all mixed up.


 Use a spring loaded scoop or a teaspoon to form balls of the mixture and drop the balls onto a parchment paper or wax paper lined cookie sheet.  Place the cookie sheet in the freezer for 10 minutes to let the balls harden.


While they are hardening, melt the almond bark, following the package directions.  Dip the balls in the almond bark and let them set on a piece of parchment or wax paper.


 Enjoy your bat poop!  Yum, yum!


This post is linked up at Blissful and Domestic
Blissful and Domestic


Thanks so much for visiting Supermommy!...Or Not.  Please take a moment to "like" me on facebook"! 

Wednesday, October 24, 2012

31 Days-Freezing Food

Want to cook half as much as you do now?  (Or maybe 1/4 as much, but still worth it!)

Whenever I make something that freezes well, I make twice as much and freeze half of it.  It really doesn't take much more effort to double a recipe.  Then, I have a meal ready to go in the oven at a moment's notice, which is a life saver with a new baby in the house!  Somehow, I got four of these Pyrex glass pans for my wedding so I usually have extras that can go in the freezer, but if they're all in use, I put the food in a foil baking pan and wrap the whole thing about 3 times with tinfoil.  Then I write what's inside on the top with a dry-erase or permanent marker (after my toddler nephew used permanent markers to write all over the walls and hard-wood floors at his house, I won't allow permanent markers in my house until the kids are older, which means that I always use a dry-erase marker)


My black dry erase marker was going dry so I got a new one out and rewrote it.  The recipe for my Deep Dish Pizza Casserole can be found here.

Want to see a complete list of the posts in the 31 Days to Simplify Your Life series?  Click here.


Thanks so much for visiting Supermommy!...Or Not.  Please take a moment to "like" me on facebook"!  

Tuesday, October 9, 2012

31 Days-Making Cookies

Who loves fresh baked cookies?  *Waves hand wildly*  Ok, who loves having to mix up a batch of cookies every time the craving for a soft, warm cookies comes up?  Not me!

When I make cookies, I double the recipe and freeze at least half for another time, but in order to have fresh baked cookies, I freeze the dough instead of the baked cookies.

But first, my tip for perfectly uniform cookies....
Instead of using teaspoons to make the cookie dough balls, use a spring release scoop (I call it an ice cream scoop, but technically, it's called a spring release scoop.  Whatever.)  I got mine at Wal-Mart.


Just scoop the cookie dough and scrape the bottom on the side of the bowl to level it off.  Then press the handle together and voila!  Perfect cookies that are all the same size (no more fighting over the biggest one).  Plus it's way easier than scraping teaspoons.


I use parchment paper on my pans to make clean up easy and to prevent the cookies from sticking.

When I freeze the cookie dough, I scoop the dough onto a baking sheet like usual, but instead of putting it in the oven, I pop it in the freezer for about 15 minutes until the dough balls are hard (You should've seen Hubby's face the first time he saw me doing that.)  Then, I throw all the balls into a ziploc freezer bag and we can have fresh baked cookies within minutes anytime we want!  Which is actually kind of dangerous for some of us....

A batch of cookie dough ready to go in the freezer. 

Want to see a complete list of the posts in the 31 Days to Simplify Your Life series?  Click here.


Thanks so much for visiting Supermommy!...Or Not.  Please take a moment to "like" me on facebook"!  

Tuesday, October 2, 2012

31 Days-How To Keep Brown Sugar Soft

I grew up doing this so I just kind of assumed that everyone did it, but after talking to some friends who were amazed at the idea, I realized that not everyone knows this trick.

Does your brown sugar get hard after a while?  A super easy way to keep it soft is to put a piece of bread in with it.  I put the heel of the loaf of bread in mine because no one eats that anyways.  If your brown sugar is already hard, putting a piece of bread in the bag or container will soften it back up.  This trick works for hard cookies too.    


Want to see a complete list of the posts in the 31 Days to Simplify Your Life series?  Click here.

Thanks so much for visiting Supermommy!...Or Not.  Please take a moment to "like" me on facebook"! 


Wednesday, September 12, 2012

Pregnancy Brain Strikes Again

The pregnancy brain strikes again....

Last night, I made chicken pot pie for supper (something which I haven't attempted since I made one about 8 years ago that turned out awful).  I found the easy recipe here and even made an extra one to freeze for later.  By the way, it was delicious!


Being the glutton for punishment that I am, I asked Princess and Little Man if they'd like to help me make the pot pies.  Naturally, they jumped at the chance.  (Before I had kids, I had visions of fun times cooking with my angelic children.  I was somehow under the impression that it would be an educational, relaxing experience.  If you've cooked with small children, you know that is NOT the case.)  1 can of potatoes all over the floor, 2 spoonfuls of filling on the counter and several smears on Little Man's clothes, and approximately 7 "it's not fair" fights later, we were ready to dump spoon the filling into the pie plates.  As I filled the first pie plate, Princess asked me once again (for about the 18th time) what we were making.  As my mouth formed the words "chicken pot pie" I realized that that was not what it was.  It was a veggie pot pie.  Grabbing two cans of chicken (remember, I doubled the recipe) from the cupboard, I quickly added them to the filling.

Whew!

Disaster averted.

And, as Hubby is under the impression that food is not food without meat, it would have most certainly been a disaster.

Thank goodness that I let the kids help me with supper even if it didn't fit my pre-kid visions of perfection.


Thanks so much for visiting Supermommy!...Or Not.  Please take a moment to "like" me on facebook"! 

Sunday, August 19, 2012

Best Recipe Ever!

I found a very handy recipe on food.com that I just HAD to pass on to the rest of you!
 

Yup.  Those are ice cubes.  You can find the recipe here.  While you're there, check out the reviews.  You will literally be rolling on the floor laughing.

Here a few of my favorite reviews:

"I guess they turned out OK. I assumed, like muffins, you had to grease the pan first. They did come out nice and easy, but they made our drinks awfully greasy. Next time I will grease AND flour the pan. Anyone else have this same problem?"

"This recipe is horrible! Maybe I should have left them in longer than two minutes (the recipe doesn't say how long to leave them in the freezer so I just kind of guessed) but mine came out all watery. I won't be making these again."

"I was wondering if you had a crock-pot version for this recipe. I work long hours and I just don't have the time to invest in this kind of hands-on cooking, but they really look yummy."

"KILLER RECIPE! Now I know what that other compartment that gets super cold is for. It sure didn't keep my lettuce happy. I also vaguely remember Ice Cubes from my childhood. G'ma made them for special occasions."

"The ice cubes were literally frozen and made my tea, coffee, soup unpleasantly cold. Besides, I prefer fresh to frozen ingredients. Sharon123's recipe for boiled Water is much better."
Sidenote: I also found this recipe for Boiled Water.  Once again, read the reviews.
Sidenote 2: I could've used the recipe for Boiled Water when I was a teenager.  While boiling water for pasta one evening, I sat down to read a book and ended up literally "burning water".  My mom, as you can imagine, was thrilled when she had to throw out the ruined pan.  

Incidentally, when my not-so-culinarily-inclined sister got married, I made her a cookbook with some of my favorite easy recipes.  The first section of the book included recipes for ice cubes, boiled water, and toast.  Yup, I'm that sister.


Thanks so much for visiting Supermommy!...Or Not.  Please take a moment to "like" me on facebook"!

Wednesday, August 8, 2012

Butterfingers Puppy Chow/Muddy Buddies

I love Puppy Chow (or Muddy Buddies...whatever you want to call it).  I don't make it very much because between me and Hubby, it's gone within a day or so.

About a year ago, I was having a serious craving for some of that chocolaty, peanut butter goodness and went to my cupboard to discover that, alas, I only had 1/2 bag of chocolate chips on hand.  Being desperate, I improvised and I loved the results so much that it's the only way I make it now.


Butterfingers Puppy Chow

1 stick (1/2 cup) of butter
1/2 bag of semisweet chocolate chips
1/2 bag of butterscotch chips
1 cup of crunchy peanut butter
9 cups of Chex cereal 
2-3 cups of powdered sugar

Melt butter in a saucepan on the stove or in a microwave safe container in the microwave.  Stir in the chocolate chips, butterscotch chips, and peanut butter.  Continue cooking until all ingredients are melted together.  Put the Chex cereal into a large covered bowl and pour the chocolate mixture over the cereal.  Fold the chocolate mixture into the cereal, making sure that all the cereal is coated.  Let cool for about 15 minutes (if you do this, you won't have to use quite as much powdered sugar since it won't get soaked into the chocolate as much).  Add the powdered sugar to the cereal in the bowl and put the lid on.  Shake the bowl until the cereal is coated.  Cool until chocolate is set and enjoy!


Thanks so much for visiting Supermommy!...Or Not.  Please take a moment to "like" me on facebook"!

Thursday, June 14, 2012

Pinterest Deliciousness! Edition 2

Here are three new recipes from my Pinterest Food board that I tried this week!

Lemon Lush Bars from Smashed Peas and Carrots
I made these super easy Lemon Lush Bars for my women's Bible Study group at church and they were a hit!  There were enough left over that I may or may not have had one for breakfast the next morning.  The recipe can be found at the Smashed Peas and Carrots blog.

Polish Cabbage Noodles
 I made this dish for supper the other night and Alison is right.  It's even better the next day.  Which is good, because leftovers are a big deal in our house.  I prefer to eat leftovers for lunch rather than making a whole new meal and Hubby takes leftovers with him for meals at work.  I made mine with kielbasa (I always stock my freezer with kielbasa when it's on sale!) and minced garlic.  So good!  Next time, I will cut down on the butter as this recipe uses a whole stick, but I don't think it'll change the overall flavor too much if I do that.  The recipe can be found at the Under the Big Oak Tree blog. 

Kool Aid Rice Krispie Treats
Because rice krispies are gluten free, they're a popular snack for Princess.  She calls them her candy bars :)  I thought it might be fun to try different flavors and was working on a recipe using jello, but then I found this recipe that mixes in 1 packet of kool-aid and figured, why fix it if it isn't broken?  Also, I have a tendency to be lazy and let others do the work for me.  I used strawberry kool-aid for my bars and skipped the frosting drizzle as I thought it would make them messier for the kids to eat (lazy... or smart?)  They were the perfect combination of sweet and sour and both my kids loved them.  I sent these to the church picnic on Sunday and didn't get very many back.  The recipe can be found at the A Turtle's Life For Me blog. 


Thanks so much for visiting Supermommy!...Or Not.  Please take a moment to "like" me on facebook"! 

Thursday, May 31, 2012

Pinterest Deliciousness!

As of this minute, I have 164 pins on my Pinterest Food board.  I've been slowly trying the recipes out, and the ones I've tried so far have definitely been keepers.  I made these two for supper tonight.  In retrospect, the two together may have been a bit of a flavor overload.

Crack Potatoes
 This easy (my #1 requirement for recipes!) cheesy hash brown dish came together quickly and is SO tasty.  There's a possibility that I went back for thirds on it.  Maybe.  The recipe can be found here at the Plain Chicken blog.


Honey Sauced Chicken
The Honey Sauced Chicken was delicious and the chicken came out super tender.  Next time, I might use a little less soy sauce, but that's just a personal preference.  I doubled the recipe so I could freeze half for another meal.  The recipe can be found here at the Mmm...Cafe blog.

Wednesday, May 30, 2012

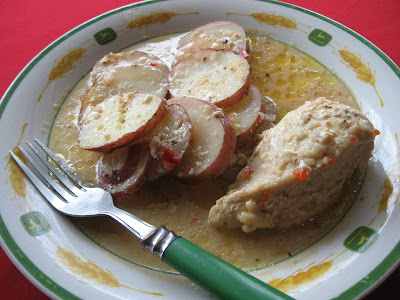
Easy Italian Chicken and Potatoes

This is one of my favorite meals and the first one I turn to when I have company.  Hubby is not a big fan of chicken (to be more specific, he rolls his eyes every time I make it), but even he likes this dish.

Easy Italian Chicken and Potatoes:


4-6 chicken breasts
1 bottle Italian salad dressing
1/2 cup parmesan cheese
4-6 red potatoes, cut into slices

Place chicken in a greased 9" x 13" pan.  Add the potatoes and pour the Italian dressing over the top of everything.  Sprinkle with parmesan cheese and bake, covered, at 350 degrees until chicken juices run clear and potatoes are soft.


So easy and the chicken always comes out moist and full of flavor.  This is a good dish to throw in the crockpot as well.  I always make tons of extras of this dish because the leftovers are even better the next day!


Thanks so much for visiting Supermommy!...Or Not.  Please take a moment to "like" me on facebook"!  


Tuesday, May 22, 2012

Cheesy Taco Shells

I've made these before, but tonight I decided to change the recipe up a bit.  They turned out sooooo yummy!


Cheesy Taco Shells

2 pounds ground beef
2 envelopes taco seasoning
1 8-oz package of cream cheese, softened
24 uncooked jumbo pasta shells
1 can enchilada sauce
1 can tomato sauce
2 cups shredded cheddar or Monterey Jack cheese
1 cup sour cream

Cook beef until no longer pink and drain.  Stir in taco seasoning.  Add cream cheese and simmer for 5 minutes or until completely melted.  Cook pasta according to box directions and drain.

Stir enchilada sauce and tomato sauce together in a separate bowl (you can add salsa if you'd like.  Personally, I don't like salsa :)  Pour 1/2 of sauce mixture into a greased 9" x 13" pan.  Fill each shell with meat mixture and place in dish.  Top with remaining sauce and cheese.  Bake at 350 degrees for 30 minutes or until cheese is melted and bubbling.  Serve with sour cream.


When I make this, I usually have enough extra noodles and meat mixture that I can also fill a 9" x 9" pan which I then freeze for another meal. 

Enjoy!
 
Thanks so much for visiting Supermommy!...Or Not.  Please take a moment to "like" me on facebook!

Tuesday, April 3, 2012

Deep Dish Pizza Casserole

I stood in front of my overflowing cupboard yesterday trying to figure out what to make for supper.  I started pulling stuff out and pretty soon I came up with this.  Sorry, no pictures because we ate it all already, and Hubby made fun of me for taking pictures of our food last time I blogged a recipe I made.  :)  But believe me, it looked good and tasted better.

Just to warn you, all measurements are approximate since I'm morally opposed to measuring while cooking.  Just kidding.  But I really don't like measuring.  I'm that lazy.  Also, I'm assuming that you have at least a basic knowledge of cooking.  If you don't, I'm not judging you.  But you should probably google "how to boil noodles" and some other basics before trying my "recipe"

I started with approximately 6 servings of spaghetti pasta.  I wanted to use elbow noodles, but we're out so...I broke the noodles into thirds before adding them to the boiling water.  When the noodles were al dente, I drained them and dumped, ahem, gently placed them in a bowl.  I added a jar of pizza sauce and half a can of olives.  Next time I make this, I'll probably throw in the whole jar of olives.  Then, I mixed in pepperonis.  Hormel's Pepperoni Minis are perfect for this.

 
 Let me just stop here and say that this casserole is completely customizable.  You can mix in whatever it is you normally like on your pizza.  Of course, if you're the only one in your house that likes supreme pizza and the others gag at the idea of anything more than pepperoni on theirs, I would recommend respecting their opinions or you might get sick of this casserole after eating it for four days straight.

Next, I put the whole shebang in a greased 9"x9" pan and sprinkled the top liberally with mozzarella cheese and more pepperonis.  Because you can never have too many pepperonis.  I baked the casserole in a 350 degree oven until the cheese on top was bubbling. 

And that's it!  Easy as pie, pizza pie that is!

Friday, March 16, 2012

Smores Bars

I absolutely love these bars!  I've made them for family and church functions and I usually come home with an empty pan.  Which actually makes me kind of sad because I could probably eat a whole pan of these myself.  In one sitting.

The original recipe I found used a 9" x 9" pan and had instructions to cut the bars into 2 1/4" x 1 1/2" squares.  To which I laughed, doubled the recipe, got out my 9" x 13" pan, and proceeded to cut the finished product into 3" x 3" squares.

You'll need:
  • 2/3 cup light corn syrup
  • 2 tablespoons of margarine or butter
  • 1 package of milk chocolate chips (or use semi-sweet if that's what you have on hand)
  • 1 teaspoon vanilla
  • 8 cups Golden Grahams cereal
  • 3 cups of miniature marshmallows
 Butter your pan.  Heat the corn syrup and margarine to boiling in a saucepan; remove from heat.  Add chocolate chips and vanilla and stir until chocolate is melted.  Fold in cereal until completely coated and then fold in the marshmallows.  Pour into your buttered pan and press with a buttered spoon or wax paper.  Let stand at room temperature for at least 1 hour (or if you're impatient and hungry like me, stick the pan in the refrigerator to speed up the process).

Bars are best when eaten within a few days.  Hehe, no problem!


Thursday, November 3, 2011

Mexican Meatloaf

I found a recipe for Mexican Meatloaf in one of my cookbooks and decided to modify it a bit for our family.  Hubby took one bite last night and informed me that the recipe is a keeper!

Here's the recipe!
*Note-I don't measure when I'm cooking so all measurements are estimates.  Feel free to add more or less of an ingredient if desired.
**This recipe makes 2 bread pan sized meatloafs (meatloaves?).  Eat one for supper and freeze the other one for another meal!

Ingredients:
2 pounds of hamburger, thawed
1 envelope of taco seasoning
1/2 cup of taco sauce
1 can of corn
1 can of diced tomatoes
2 cups of cheddar cheese, divided
2 eggs, beaten (or you can be lazy/smart like me and beat them as you're adding them to the meatloaf mixture.)
3/4 cups bread crumbs (start with a little less and gradually add more until the meat is the right consistency)

Combine the hamburger, taco seasoning, taco sauce, corn, tomatoes, eggs, and 1 1/2 cups of cheese in a bowl.  When mixed well, add the bread crumbs until the mixture is the right consistency.  Divide in half and shape each half into loaf form in an ungreased bread pan.  Bake at 350 degrees for 1 hour or until center is no longer pink (Don't you just hate it when recipes tell you to do that?  How am I supposed to know if the center is pink unless I dig the middle out?)  Sprinkle the reserved 1/2 cup of cheese on top and bake just until melted.  Watch it closely or you'll end up with browned crispy cheese on top like I did.  Serve with sour cream and lettuce if desired.

Tuesday, August 30, 2011

One of My Favorite Meals

I've always been a fan of breakfast for supper (or dinner, or whatever you call it)  Working at two different bed and breakfasts over a period of 10 years and being a cook at the second, I've had many opportunities to try out new breakfast foods.  Here's one of my favorite breakfast-for-supper meals.  The omelet is a recipe from the first B&B I worked at and the potatoes are a recipe I made almost every morning at the second B&B.

First, cut up into chunks one red potato for each person who will be dining with you for this fine gourmet meal.  Put the potatoes into a pot and cover with water; bring to a boil.  While the potatoes are boiling, brown sausage or bacon in a frying pan.


When the meat is done, move it to a covered plate in the microwave or oven to keep warm.  Do not drain or rinse the frying pan.  When potatoes are soft, but before they're mushy (because otherwise, you end up with fried mashed potatoes, which albeit is kinda' good, it isn't what we're going for here), drain the water off and dump the potatoes in the same frying pan you used to fry the meat.  Add a few tablespoons of oil and liberally season.  My favorite seasoning on potatoes is Canadian Steak Seasoning which I buy at Sam's Club.  You could also use any variety of spices such as garlic, onion, seasoning salt, etc.  Just season those babies with whatever strikes your fancy.


Fry the potatoes on medium to high heat, occasionally scraping the bottom of the pan and turning the potatoes with a metal spatula.  Don't do this too often as it makes the potatoes fall apart and not brown as well. 


 Now it's time to start working on the omelets.  This recipe will make 6-8 omelets depending on how much filling you put in each one.  I usually make 4 and throw the extra filling in with the potatoes.  

 Mix 1 block of cream cheese with a 12-15 oz tub of ricotta cheese.  Or if you're like me and realize after the store has closed, that the tub of ricotta cheese in your fridge is actually leftover watermelon from a week ago, you can go upstairs to your neighbor, borrow a cup of cottage cheese, and mash it with a fork until it's almost the same consistency as ricotta cheese.  You may need to microwave the mixture so it combines well.  Add some spices.  I use parsley, basil, onion, and garlic powder.


In a separate bowl, whisk 2-3 eggs for each omelet you plan on making.  Pour enough egg mixture into a well-greased frying pan (preferably non-stick!) to cover the bottom well.  If you make it too thin, it won't fold without tearing.  As it cooks, tilt the pan to ensure that the eggs cook evenly.  When the eggs are done, spoon some of the ricotta/cream cheese mixture down the center of the omelet.  We're cheese addicts at my house so I tend to go overboard here.


Using a spatula, loosen the edges of the omelet and carefully fold each side over to the center.  If you mess up and it tears, don't worry.  I know from experience that it will still taste just as good. 


Let the omelet sit for 3-5 minutes to heat the filling completely.  When it's done, use your spatula to slide the omelet out of the pan right onto a plate.  Dish up the potatoes and sausage (or bacon) and enjoy! 


Related Posts Plugin for WordPress, Blogger...